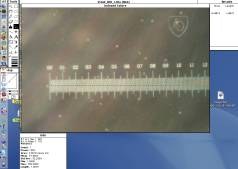
- Open Scion Image 1. 63 or later. (To download this software go to http://www.scioncorp.com/pages/download_now.htm. The most recent version is available from Scion Corporation's web site: http://www.scioncorp.com)
Update 12/24/2013: Please consider using ImageJ instead. - Open the scale picture for calibration of the root image to the scale image. (Note that this micro scale was taken at same resolution [180-pixel] and magnification [4x1000] as the picture with root image being analyzed). If you have saved the picture at different resolution, please re-size to the correct resolution before proceeding.
- Once the micro scale image is open, you need to calibrate and set needed distance/area units. To do so, go to:
- Analyze --> Calibrate --> Check straight line --> click OK
- Analyze --> Set Scale; select Millimeters in the Select Units space. Then, click OK. (180 => 7.08660 pixels, was the original info).
- File --> Get Info. (An Info window will appear on your screen. This is only for reference of your entered calibrations).
- Select Length icon in Tools menu. Then measure the distance of 1 millimeter in the micrometer scale shown in the picture. To do this, once you clicked the length icon make a line with mouse by dragging the mouse along the distance of 1 mm.
Get the measurement by: - Hitting 1 while holding Apple key (or Control Key, for Widow users).
- Then, record the value of Pixels (?556), corresponding to the measured 1mm distance on the Info Window, writing it down on a piece of paper.
- To see the complete sheet of recorded data, go to Analyze--> Show Results. The results window will appear on the right up side of the screen on your computer.
- Open the root image. Take the calibrations made to the scale image (ruler) and apply to your root image (see steps 3 above).
- With the Root image picture opened and active, go to Analyze --> Set Scale --> [Enter in Units box: Millimeters (usually it will be already set from scale image calibrations); Enter in Scale box: the value of pixels recorded in 3 d above. (Remember that this will be the number of pixels in 1mm of straight line).
- Now you are ready to take measurements through steps 3 d (expect the last point/paragraph). Hit 1 while holding Apple key (or Control Key, for Widow users), each time you make a new root hair measurement. (Usually we measure 5 root hairs per root sample/picture to get the average of the sub-sample. One replication may have 3 root samples).
- When you finish with the measurements of Root hair lengths and data recorded in Results windows (as described in 3d), to save your data Click Edit --> Copy Measurements. Then, open Excel, SPSS or other Spreadsheet program. There, go to Edit menu and click Paste. Your measurements will be automatically transferred to the spreadsheet.
- Usually more than one column are copied and transferred (columns like area, mean, standard deviation, unless you have unchecked it previously, that is, before taking the measurements). To do so, go to Analyze --> Options and uncheck unnecessary parameters, leaving only Length (or Area, for root hair density. See procedures on the Root hair density section).


