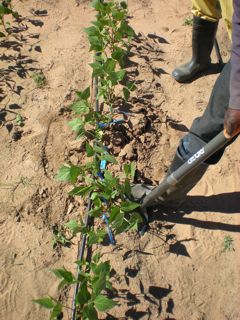
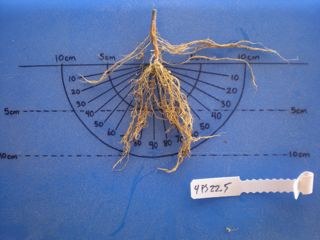
This shows root crown phenotyping of the common bean root system.
Step 1: Identify Sample
Pick representative samples


Step 2: Dig out Sample
This can be harder than it sounds. You certainly don't want to cut too close to the stem because then you won't have enough roots to look at. But you can't dig too big of a hole either because then the root ball will break and split apart and cause whole sections of roots to be cut off and lost. All this depends upon soil texture but we have found that about 25cm around the stem is generally big enough section to get a good look at the roots but not so big that they start breaking apart.
Carefully dig all around the plant or plants that you're excavating and then slide a shovel underneath the root ball and lift it out with the help of your other hand. Then either put the root ball in a wheelbarrow for transport to the washing area or put it directly in a bath.


Step 3: Soak, wash and rinse sample
Soil, especially soil with high clay content is not readily removed from roots and since bean roots are especially fragile, much care must be taken. We fill up 30L tubs with soap and water and let the root ball sit there for at least 10 minutes. Sometimes you get a sample that needs to be soaked for longer. After this period you can carefully massage and move the disintegrating root ball around in the water and delicately wash all soil off the roots. One does lose a portion of fine roots but we haven't found any better way that avoids this.
After you have washed the sample dunk it in some clean, non-soapy water. Let them stay in the rinse bucket until they're ready to be scored because bean roots dry out quickly and then stay in whatever angles they happened to be in when they were drying. Leaving them in the rinse bucket will allow the root system to remain as hydrated and unchanged as possible.


Step 4: Take picture of sample
While pictures aren't nearly as good as actually looking at the sample and even though these type of pictures aren't useful for computer analysis (see maize root sectioning method) they are still helpful for coarse comparisons and to refresh your memory. They will also help you remember from experiment to experiment and year-to-year what scores you were giving to what roots.
We made ourselves a "picture board" out of a blue cutting board and drew on it with a black permanent marker. It helps the angles, size, branching and nodulation stand out better than on a white board. We drew scales on the board to speed evaluation of the various characteristics.

Step 5: Score sample
The parameters you score, how you score them and how quantitative you want to be is totally up to your discretion. It is of course best to be as quantitative as possible but the more parameters that you actually measure means each sample takes longer. If you need to look at 100 samples a day 1 minute more or less adds up to lot of time!
Some of the traits we look at include: basal root angles, basal diameter, length and number, basal lateral branching, adventitious diameter, length and number, adventitious branching density, tap diameter, length and tap branching density, nodule size, number of good nodules and nodule distribution. We also give a disease rating (1-9).
We have tried to find a balance between quantitative measuring and the more subjective scoring. For example, to estimate basal and adventitious root length using the intensive method we measure their diameter 1 cm from the stem with calipers. For number of adventitious roots we count the number of roots, and to estimate branching density we count roots in a representative 2cm segment. For the quick way we just visually consider all the parameters mentioned above and assign them a score of 1 to 9 (1 excellent to 9 very poor). We also adapt our protocol for the type and size of experiment. For a mechanistic or physiological study we'll do the more intensive quantitative measurements. For a large phenotyping study where we're just trying to see what types of roots different genotypes have we'll do the less intensive and less time consuming scoring method.
We made ourselves "scoring boards" similar to the "picture boards" but with the scale (1 good - 9 bad), dots for nodule size that correspond to diameter in millimeters (1-5), and with centimeter markings around the edges to facilitate counting branching density.


